BassAsin Posted December 5, 2011 Report Share Posted December 5, 2011 I'm liking this thread quite a bit. the few shacks i have built over the years and sold eventually were 2x4 ripped into 2x2 with mahogony underlay used for sheathing on 24" centre, no structural issues. your 2x3 and 1/4" ply will be more than suffice. just as a heads up, make sure that your windows are set at a comfortable level both when standing up as well as sitting down in the shack. nothing worse than having to stand up beside your lazy boy in the shack to watch your outside lines. Link to comment Share on other sites More sharing options...
Fishnwire Posted December 6, 2011 Author Report Share Posted December 6, 2011 I'm liking this thread quite a bit. the few shacks i have built over the years and sold eventually were 2x4 ripped into 2x2 with mahogony underlay used for sheathing on 24" centre, no structural issues. your 2x3 and 1/4" ply will be more than suffice. just as a heads up, make sure that your windows are set at a comfortable level both when standing up as well as sitting down in the shack. nothing worse than having to stand up beside your lazy boy in the shack to watch your outside lines. Thanks for your praise and more so for your advice. I've given the window height quite a bit of thought and I think I'm going to be happy with them. From the pic you might think they're a little high but that wall is going up so that the window is on the lower half of it, not the upper. You might have to bend over a little if you're standing to see out them, but you won't have to stand up if you're sitting. Thanks for letting me know I'm on the right track and double thanks for giving me a head's up. Link to comment Share on other sites More sharing options...
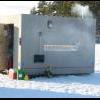
Fishnwire Posted December 6, 2011 Author Report Share Posted December 6, 2011 (edited) Update...Dec 5 - OK...I don't have a lot to show. We made as much progress as possible today. Curing time holds things up. We finished the last of the framing on the first wall, cut the plywood to accommodate the window, and then glued and screwed it down. What sucked was that we were pretty much at a standstill at this point. The construction adhesive needs time to cure, so we couldn't put the finished wall out side to make room to start another. So we went and got the rest of the studs we need, more glue, kerosene for the heater, and and few other things. We came back and picked out our headers and footers (straightest ones) and then cut the rest of our studs on the miter saw. Then we started talking about what we'd do with the outside walls, as far as painting or staining them. I realized that while the adhesive is drying in the heated garage overnight, it would be a good time to stain or paint it, so that it could dry too. I don't know when the next time is that I'll have a heated space and time to do such a thing...finding a place to do it once the walls are up would be hard. Now was absolutely the time. I ran out and looked at a few options. I decided to go with a tinted oil deck stain. It's supposed to be good for at least 5 years, it requires only one coat, and was available in many shades...they take the base, add the tint and mix it up right there. I picked something called "north pole"...seems appropriate. Good thing I only needed a gallon...it was close to $50. If I painted or went with a non-oil based stain, I would have had to prime or do a second coat (respectively) and lost an added a day's drying time to each wall. Plus, once I'd buy the primer plus paint, or two gallons (instead of one) of stain, I wouldn't save any money. Here's the first wall stained. It looks pretty gray in the pics, but has a slight bluish tint to it in "real life". There is one spot were the chalk liner puked out an insane amount of chalk, and although I cleaned it up as best I could, there's a reddish hue coming through...what are you gonna do? It's just an ice hut after all. Gimme a break already. - So the plan is to move that wall outside in the morning, put a tarp on it, and then start the opposite wall. We'll (hopefully) finish that studding (including framing a window) glue and screw the plywood, stain it, and let that cure/dry overnight. If that goes as scheduled I'll have the walls done by the end of my days off. After that I still need to take the base out of the garage, invert it, put it back in the garage, cut and glue the insulation, apply the sliders (still don't have 'em) let all adhesive (foam board stuff and regular stuff for the sliders) dry, take it back out of the garage and flip it back over, put it on a trailer, stack the finished walls on top, drive it to my buddy's with a huge garage (works on semis in there, but will only give me a day or two) unload it, put walls up, build roof, let adhesive dry overnight, load it on the trailer and take to my driveway...(Whew...just thinking about all that work makes me tired) then I can heat the inside while I do the insulation, paneling, benches, shelves, wood stove and pipe, holes, roof exterior, etc. I'll be able to do an hour or two of construction after work, where as now I have to drive halfway across town just to get to the build site. I'm sure there will be sufficient ice to drive a tow vehicle on before I'm done...I just hope it hasn't all melted by then. Edited December 6, 2011 by fishNwire Link to comment Share on other sites More sharing options...
Sinker Posted December 6, 2011 Report Share Posted December 6, 2011 You really are building a mansion for the ice. Over kill, bigtime. How much do you figure that floor alone weighs? I can't even begin to guess how much the whole thing weighs. our 8x10 is 600lbs. S. Link to comment Share on other sites More sharing options...
Fishnwire Posted December 6, 2011 Author Report Share Posted December 6, 2011 You really are building a mansion for the ice. Over kill, bigtime. How much do you figure that floor alone weighs? I can't even begin to guess how much the whole thing weighs. our 8x10 is 600lbs. S. Yes. I really am building a mansion for the ice. Thanks for noticing from the pics...imagine how my guests will feel. It's being built for comfort and longevity...not for mobility. It will see the highway one time, spending summers blocked up on the shore less than a kilometer from where it will spend its winters. My partner has a 3/4 ton diesel with plow and I a Jeep Rubicon with 6 inches of lift, 33 inch winter tires, and a 9500 lb winch. I'll get it where it needs to go. I can't even begin to guess how much the whole thing weighs either. I know that my 79 year old Father-in-law and I could shift the completed base around the garage floor by ourselves, so it might weigh a little less than you think. I'm sure your 8x10 is solid, comfortable, warm...and that you get the experience you want from it. I want a place I can feel at home for three or four nights at a time...and I want my wife and the Old Man to feel the same way. Wow. I guess I'm coming off as a little defensive...I see that. Maybe I'm way too into this? Link to comment Share on other sites More sharing options...
Sinker Posted December 6, 2011 Report Share Posted December 6, 2011 Naw...its all good. Moving a hut that size may not be as easy as you think though. Just sayin..... I had several heavy huts before I learned my lesson. S. Link to comment Share on other sites More sharing options...
Fishnwire Posted December 6, 2011 Author Report Share Posted December 6, 2011 Naw...its all good. Moving a hut that size may not be as easy as you think though. Just sayin..... I had several heavy huts before I learned my lesson. S. I appreciate the heads up...I really do. I've gone with things like 2x3s instated of 2x4s and quarter ply instead of 3/8 or half inch that I would have if weight wasn't an issue. I was also talked out of a pre-hung door in favour of just using the plywood (backed with insulation) that I'll cut out for the door opening. Things like that. It's not like I have a total disregard for weight...but with my situation, I can afford to pack on a couple of pounds that others (without plows and Jeeps at their immediate disposal) might not be able to afford. Regardless, nobody said it would be easy. Someone though did say that if it was easy, everyone would do it. I'm sure there will be lots of friggin' around, a few mishaps, and some near catastrophes in the building, transport, and life of this hut. That's the same as just about every weekend at camp for me though...that's part of the fun. My Father-in-law already mentioned something about what we'll do differently when we construct "the next hut"...a sort of shuttle to the mother-ship we are now building...for day excursions to side lakes or back bays. It'll be his turn to pay for that one, and he'll probably take all the advice on lightweight construction he can get. Link to comment Share on other sites More sharing options...
Twocoda Posted December 6, 2011 Report Share Posted December 6, 2011 (edited) too heavy ...too light...too big ...too small but your ice fishing fun started the day you bought your first piece of lumber for this project...i hope this hut serves you and yours well for many years of fun memories and comfort.....i dont ice fish ...but if i was to....it would be in something similar to this calibre of comfort.... IF your canvassing for a name for the hut ..."Stayin N Style" comes to mind cuz everyone else will be gone home and youll still be (supposedly) fishing Cheers and good luck with the project...build threads are alot of fun !!!!and thanks for taking us along for the journey Edited December 6, 2011 by Twocoda Link to comment Share on other sites More sharing options...
Fishnwire Posted December 8, 2011 Author Report Share Posted December 8, 2011 (edited) Hey Folks... We worked the last two days but I didn't post an update yesterday...I had non-icehut related matters (also referred to as my life) that I had to attend to. Priorities suck when they get in the way of frivolities. On Tuesday morning we showed up to find the stain dry...but the fumes from it very much still present. My brother-in-law's wife made him change his clothes and shower after he was in there at about 9 pm the night before just long enough to put fuel in the heater and turn off the lights. That stuff is pungent. We opened the garage door and let it air out for a few minutes and then moved the completed north wall out into the driveway. There was only the Old Man and I so we shifted one edge onto a couple of dollies, then picked up the opposite side and walked it out. Then we rested it on four milk crates. Now we had room to start the south wall. So away we went. I picked out the placement of the window (I wanted this one a fair bit higher and off to one side) and we started framing. Then glue, plywood, screws, stain...no buffing or scrubbing, it's just that easy! We'll cut the hole for the window from the other side, once the wall is up. No need to stain there. We left that to dry overnight (cracked a window this time) and I went to Fabricland to look at 4 inch foam, which I thought I'd use for my bunks/benches. It's $65 a meter, and I'd need nearly four meters of it, so I'm looking at other options. Even the two inch stuff (how good a night's sleep would you get on that?) would cost me $140...I think I can find something better and cheaper. My buddy suggested crib mattresses...I might go look at those. I'd also love to hear other suggestions...that's YOU folks. We happened to have four guys first thing this morning, so we each picked up a corner and easily moved the completed south wall outside and rested it on top of the north wall. We began the west wall next. I wanted this window low like the first one and off-centre enough to stay away from the stove that will go in the west-north corner. We finished framing it, put the plywood on (with glues and screws of course)... Then...my camera's batteries died. We finished the screwin' and stained it. Then went for lunch. When we came back, (because of it smaller size than the north and south walls) we were able to lean it against a wall inside the garage. This freed up the space to start the east wall. Knowing I want a 30" bench/bunk along the west wall (anything less will not provide a comfy night's sleep), I put the door so that I'll have room once the inside is insulated and paneled. I wanted a door around 32" wide (I'll have a bulky snowsuit on a lot of the time I'm going through it) so I had to off-centre the opening. Not by much, a few inches maybe. We finished the framing, and were ready to lay the plywood down, but my 79 year old Father-in-law decided he was "tired" and "hungry" and wanted to call it a day...can you believe that garbage? If it wasn't for the fact that his knowledge and experience as a carpenter has prevented me from making innumerable mistakes, some of which would have nearly ruined the build, and at best I'd have a rickety, drafty piece of junk at this point...............On second thought, let's just forget I said anything. Almost done though. All that's left is (not necessarily in order): Cut plywood for door. Lay down plywood on east wall. Stain it. Frame and hang door. Invert base (need at least four guys). Fit insulation to floor, glue it in, let it dry. Re-invert base, load on trailer, (walls too) take to my driveway. Unload it all, level out base. Assemble walls to base. Construct roof. Insulate walls Panel interior walls Build benches/bunk, shelves, etc Cut holes for fishing. Install metal base/backing for stove. Install stove/stove pipe. Attach metal roof. Wire electrics (surface mount). The time it will take is one thing, but nearly every one of those things requires an investment of something other than time, if you know what I mean. I think I have a line on a free wood stove and all the metal I need to back it, but other stuff won't be as cheaply available. I've already got the insulation for the floor, but I don't have any yet for the walls or roof...the cost of that stuff adds up when you buy 24 sheets at once. I'm not looking forward to that hit. I am looking forward to having a well insulated hut to kick back in though, so what am I gonna do...right? I will say that this thing is costing me more than I anticipated. Maybe not so much what I budgeted, because when I thought about how much I could (should?) spend, and then did a preliminary investigation of what I thought it would cost, I figured I'd have a ton of "wiggle room". If a hut was constructed of little more than studs and plywood (the cost of which I concentrated on) I could build three of them for what this thing will cost. I didn't realize just how much things like construction adhesive, screws and nails, insulation, stain, a few tools I didn't have, kerosene for the heater, burning gas in the truck running around...and so on (and so on and so on it seems) adds to the cost of such a project. I've heard you should always make the most accurate budget you can predict...and then double it. I'm not there yet, but I might get close. That's FA...I'm going to end up with the hut I want and it's not going to break me. By the time's it's done, I might have to offer you a cheap brand of beer if you show up...but I won't have have to live in it, so it's all good. More tomorrow I hope. Don't forget to give me your suggestions for bench/bunk padding. I need something no more than 30 inches wide, and it has to provide a decent night's sleep so it should be 3 or 4 inches thick at least. Thanks in advance for your ideas...thanks for just following along. Edited December 8, 2011 by fishNwire Link to comment Share on other sites More sharing options...
Skipper D Posted December 8, 2011 Report Share Posted December 8, 2011 Might be time for you to start hitting Kijiji for what you need to finish the project . Link to comment Share on other sites More sharing options...
Billy Bob Posted December 8, 2011 Report Share Posted December 8, 2011 Once I seen the Toyota truck in the driveway, I knew you guys knew what you were doing..... So have you thought of renting in the summer as a small cottage.... Bob Link to comment Share on other sites More sharing options...
wormdunker Posted December 8, 2011 Report Share Posted December 8, 2011 I love your enthusiasm What a shack!! I built a 5x10' hut 4 years ago with skis similar to yours. I covered the bottom of the skis with galvanized steel studs which r 6" wide. Same material used during steel stud framing of a commercial building. U can purchase these at Patene building supplies for about $30.00. Good luck keep us updated!! Link to comment Share on other sites More sharing options...
Nipfisher Posted December 8, 2011 Report Share Posted December 8, 2011 Search kijiji and other classifieds for cushions from a tent trailer or older trailer. They work perfect for bunks/benches. I use Therm-a-rests for mine. They inflate to about an inch thick. When not in use they roll up and fit inside a storage cooler I have in the hut. If you lok back to the pictures I posted of the Nipissing gtg on Callander Bay you will see that my benches/beds fold down from the wall. They are supported by straps and legs. I made them 24" wide and 6' 5" long. Couch cushions can be cut down to a better thickness but it is a bit messy. Link to comment Share on other sites More sharing options...
Fishnwire Posted December 9, 2011 Author Report Share Posted December 9, 2011 More progress...a little anyway. First of all, we're finally getting a bit of winter weather here in Sudbury. This was the view outside the garage by about noon yesterday. I swept off my walls and then shoveled the driveway for my Brother-in-law. I'm really grateful for the use of his garage...and he did say it was "taking a little longer than I thought"...so I want to hurry up and get out of there while trying to be a good guest at the same time. One thing I forgot to mention was that we cut groves in the west wall to accommodate the runners. Check it out. That was yesterday. I cut them before I stained so that I could stain along the cut edges. Anyway... When we got there today, We were finished framing the east wall, so we cut the opening for the door and then glued 'n' screwed the plywood down. Then the stain... We let it dry for a couple hours while we got supplies to build the door and had a bite to eat. Then we leaned it against the garage door with the west wall. I'll cut the footer at the door opening once the walls are up so there's nothing to trip over. I need it for now to maintain the structural integrity of the wall. After we moved it I realized I forgot to cut the notches for the skis. The stain was a bit tacky still and I didn't want to generate the sawdust so that will have to wait until later. Next we built a simple door. We made it out of the same quarter ply and 2x3's the rest of the walls are made from. It fits like a glove and is remarkably rigid, considering it's components' relative flimsiness. I figure it'll stiffen up even more once I fit and glue the insulation down. The doubling up along the sides was structurally unnecessary, but that way it gives me something meaty to attach hardware to. I had some time left after my Father-in-law went home so I went ahead with an idea I've been playing with. Guys have told me to use 2x(whatever) blocks between the runners and ice to keep the hut from freezing in. Someone else mentioned styrofoam blue-board is good because it resists freezing in. I figured I'd combine the two. I bought a one inch thick 2'x8' piece of blue-board and two pressure treated 10 foot 2"x8"s. I cut the insulation into three 8 inch wide strips. Then I took the 2x8s and applied foam board adhesive to the tops, then the foam board on top. Then I made a "double foam-board on pressure treated" sandwich, and clamped it all together. When I take the clamps off, I'll have two pieces, each ten feet long (will fit inside shack for transport) that I can put under the hut, insulation side down and running perpendicular to the skis. If they don't work it will have cost me around $40 to find out. I've had more expensive lessons that taught me less. I figured it was worth a try. I'll let everyone know how they work out. I go back to work Friday but am on night-shift, so I'm hoping to get some work done in the morning. The problem is that the next step is insulating the floor, and I need to organize a time when I can get 4 to a half-dozen men over there to flip that heavy such-and-such over. It'll take some effort, but I'm sure it's do-able We have to pull it out of the garage (we have dollies) flip it over, put it back on the dollies and wheel back inside. I'll be happy when that is done, except that I'll know I have to do it all over again to get it right-side up. Pics of an inverted base to come next...I hope. Link to comment Share on other sites More sharing options...
Billy Bob Posted December 9, 2011 Report Share Posted December 9, 2011 Wouldn't a DARK color been better to draw the heat from the sun....in the spring I have a all BLACK fishing jacket for that reason. Bob Nice job....but I'm concerned with the overall weight. Link to comment Share on other sites More sharing options...
Fishnwire Posted December 9, 2011 Author Report Share Posted December 9, 2011 Wouldn't a DARK color been better to draw the heat from the sun....in the spring I have a all BLACK fishing jacket for that reason. Bob Nice job....but I'm concerned with the overall weight. Good question...on a different forum (ice fishing related only) this topic came up on another poster's thread and a few people warned that dark coloured shacks tend to melt the ice and snow around the hut faster than light coloured shacks. It would seem to me the opposite would be true...the light and heat being absorbed by a dark shack as opposed to a light shack which (one would think) would reflect that light and heat back onto the surrounding ice and snow. Who knows? I went with a shade of stain I thought was sort of neutral, plus I just liked that colour. I'm real happy with how it looks dry...the grain of the wood is not covered up but enhanced, and the bluish-gray has an arctic feel to it. Besides, this hut is going to be tight and well-insulated (walls, ceiling and floor)...if the stove is going, a lack of heat probably won't be a problem. Two guys exhaled breath alone will probably bring the temp up a degree or two. As far as the overall weight goes...I'm "concerned" too. But I want a certain type of "ice-hut" experience, and am willing to put up with a lot a friggin' around to have that. Link to comment Share on other sites More sharing options...
Nipfisher Posted December 9, 2011 Report Share Posted December 9, 2011 The problem is that the next step is insulating the floor, and I need to organize a time when I can get 4 to a half-dozen men over there to flip that heavy such-and-such over. It'll take some effort, but I'm sure it's do-able We have to pull it out of the garage (we have dollies) flip it over, put it back on the dollies and wheel back inside. I'll be happy when that is done, except that I'll know I have to do it all over again to get it right-side up. Pics of an inverted base to come next...I hope. Why not use the jack-alls you said you have to lift it up and block it? Then you can apply the styrafoam from underneath.It wont help much with the runners but you could get the foam done on your own or with the help of your father in law. I just repaired one of my runners this week. I jacked up each side of my hut and blocked it up. Laying on my back I was able to remove and re-attach the plastic runner by myself.. Link to comment Share on other sites More sharing options...
Nipfisher Posted December 9, 2011 Report Share Posted December 9, 2011 Good question...on a different forum (ice fishing related only) this topic came up on another poster's thread and a few people warned that dark coloured shacks tend to melt the ice and snow around the hut faster than light coloured shacks. It would seem to me the opposite would be true...the light and heat being absorbed by a dark shack as opposed to a light shack which (one would think) would reflect that light and heat back onto the surrounding ice and snow. Who knows? I went with a shade of stain I thought was sort of neutral, plus I just liked that colour. I'm real happy with how it looks dry...the grain of the wood is not covered up but enhanced, and the bluish-gray has an arctic feel to it. My hut had white vinyl siding on it when I bought it. I was concerned about white on white snow but my hut has reflectors on every side. It shines in the head lights. Make sure your hut is visable to smowmobilers! Link to comment Share on other sites More sharing options...
Billy Bob Posted December 9, 2011 Report Share Posted December 9, 2011 As far as the overall weight goes...I'm "concerned" too. But I want a certain type of "ice-hut" experience, and am willing to put up with a lot a friggin' around to have that. Well I will say this....if you ever invite this old Redneck up there I would not refuse to take part in what looks like one of the finest ice fishing Resorts I have seen go together..... I only have one more thing to say............. "Get 'R Done" .... Bob Link to comment Share on other sites More sharing options...
Fishnwire Posted December 15, 2011 Author Report Share Posted December 15, 2011 (edited) Hey Folks... I've been working (for a living...not the fun kind) quite a bit lately so the progress is not great. Last time on "Ice Hut Build" we finished the walls and door, including stain, and were ready to start insulating them. We tried cutting the 2 inch "Plastispan" foam boards with a utility knife, but it was a bit "hacky", so we used the circular saw and straight edge. It worked great and we did the door and west wall it will hang on. We had planned on using foam board adhesive. This stuff... But we soon found out it is terrible stuff to work with. Its consistency is nothing like regular PL Premium construction adhesive, which spreads easily but (I've been told) burns through foam board. You also need to apply "mechanical support" for 24 hours while it dries. We had to weigh it down and were running out of heavy stuff to do so with. I decided to forgo the adhesive, knowing the paneling I'll use will keep the foam board from going anywhere. This also meant I couldn't use it (count on it) to keep my foam panels on the underside in place. I had previously considered skinning the bottom with 3/8s ply, so that made up my mind. The ply will sandwich the foam board beneath the floor ply. The other thing we found out is that cutting foam board with a Skilsaw, while allowing for a perfect fit, creates a lot of foamy sawdust. That stuff (unlike wood sawdust) just flies around when you try to sweep it up. I didn't want to generate that kind of mess in my Brother-in-law's normally pristine garage. Knowing we didn't need the heated space for foam board adhesive to cure, we decided we were done there. We loaded the 4 walls on my trailer and brought them to my Father-in-law's driveway. It's pretty big. He promised my Mother-in-law we'd have it done and out of there by Christmas...which he agreed to knowing full well it will never happen. He wonders why he gets into trouble with her. Then again, I've pulled similar stuff on his daughter, so I can't judge. Then we made a second trip for the base. That's my buddy whose place the hut is going. The three of us and my Dad just picked up the base and put it on the trailer, no problem. It wasn't as heavy as I thought...not nearly as much. The walls are really light. I think this thing is not going to be quite the pig I had imagined. We unloaded at the new site. You'll notice there's little sign that winter has arrived in Sudbury. At least it takes the pressure off of the build schedule knowing there's nothing resembling an ice surface that will accommodate it within at least a hundred kilometers. Flipping the base was not as hard as I thought it would be either. "My Two Dads" and I did it ourselves, with only a moment's grunting. I picked up some 1/4 puckboard cut into 4 inch strips, 8 feet long. It cost me about $70 tax in. I had a few lines on free alternatives...but none seemed to pan out and I just needed something so I could get it done. I picked up a number 8 bit with a collar that allows counter-sinking of the screw head, and put about a million 2 inch screws in. I tried one inch screws but they spun instead of "sucking in" slightly. I wanted to cut the jigging holes before I fit the insulation and then the underskin, figuring it would be easier to do it one layer at a time. Ideally I'd like them about 6 inches closer to the bench than where they will go, but the runners are in the way. My other option is to move them to the insides of the runners, but they'll be way too close for comfortable jigging...almost between ones' feet. If I'd have moved the runners further out, I'd have needed another east/west joist between them, so this was the best option. Also this leaves a nice, wide walk-way through the centre of the hut. I bought some pails from Lowes to insert into the holes to cut down on draft and provide a "catch-ridge" for items accidentally kicked around or dropped on the floor. My father in law had a bunch...but they were of a variety of sizes and current condition. I figured it would save a lot of hassle to just get four the same size and that are easily replaceable. They were about $4 each, so they're far from a big ticket item. They came with lids which I'll glue the insulation I'll cut out for the holes to the underside of. They also have a nice big lip on the outside a few inches down that will allow them to fit nicely and flat even if my hole cuts are not perfect. I turned them upside down and cut the bottoms out with a jigsaw. Look at the Old Man...he's in his glory. I can't seem to find a pic of my Mother-in-law from today with a similar look on her face. Oh well. It was raining pretty hard by now, so we didn't want to bust out the power tools in it. That was the end of things for the day. Tomorrow I want to cut those holes, fit the insulation and underskin for the floor (cut those holes) and flip it back over. The following day the walls go up. Thanks for checking in... FISH'n'WIRE Edited December 15, 2011 by fishNwire Link to comment Share on other sites More sharing options...
Nipfisher Posted December 15, 2011 Report Share Posted December 15, 2011 Coming along nicely. Link to comment Share on other sites More sharing options...
Fishnwire Posted December 15, 2011 Author Report Share Posted December 15, 2011 Coming along nicely. Slower than I'd like...and a bit more $ than I planned. But thanks. I realize these updates are painfully slow and contain way more detail than anyone is likely interested in, but I'm using it like kind of a personal journal documenting the build...something for me to look back on. If others get some insight that is useful in their own builds...that's great too. The questions, comments and criticisms from everyone have been invaluable at times too. I really appreciate them. I look forward to being able to post pics of the finished product in its intended location for those that have followed along. I also promise that I'll let everyone know how things like transport to the ice, moving it around, freezing in, and other problems are handled, should they arise. I want this to be the report that I'd have wanted to read before I started this build. If I screw up huge in some way (many ways?)...you will all know about it. Link to comment Share on other sites More sharing options...
Billy Bob Posted December 15, 2011 Report Share Posted December 15, 2011 I would be VERY VERY interested on how you move this Ice Resort on and off the ice.....is it possible to video tape that procedure..... GOOD LUCK....it's looking FIRST CLASS...why I have rented cottages (that's what they called them, not my wife) that were not half as nice as your Ice Resort. Bob Link to comment Share on other sites More sharing options...
Fishnwire Posted December 15, 2011 Author Report Share Posted December 15, 2011 I would be VERY VERY interested on how you move this Ice Resort on and off the ice.....is it possible to video tape that procedure..... GOOD LUCK....it's looking FIRST CLASS...why I have rented cottages (that's what they called them, not my wife) that were not half as nice as your Ice Resort. Bob I had thought maybe I'd hire a tilt and load tow truck, but today I was offered the use of a double axle landscapers trailer that will (just barely) accommodate the hut. It will only see the highway one time, I'll put it on the ice via a frozen boat ramp, and I just have to pull it up on my buddy's lawn in the spring. I can't promise video but you'll get to see a few pics. Link to comment Share on other sites More sharing options...
Billy Bob Posted December 15, 2011 Report Share Posted December 15, 2011 I had thought maybe I'd hire a tilt and load tow truck, but today I was offered the use of a double axle landscapers trailer that will (just barely) accommodate the hut. It will only see the highway one time, I'll put it on the ice via a frozen boat ramp, and I just have to pull it up on my buddy's lawn in the spring. I can't promise video but you'll get to see a few pics. Sounds good...just hope the weather now cooperates for you guys ASAP.... As a old saying goes "it's tough sledding without snow"....and this time it hits the ice hut nail almost on the head....LOL Link to comment Share on other sites More sharing options...


Recommended Posts
Create an account or sign in to comment
You need to be a member in order to leave a comment
Create an account
Sign up for a new account in our community. It's easy!
Register a new accountSign in
Already have an account? Sign in here.
Sign In Now