Nipfisher Posted November 29, 2011 Report Share Posted November 29, 2011 Rod Caster had this thread last winter. some nice shacks on this site. My new one is on the 2nd page. Ice shacks home made or not Link to comment Share on other sites More sharing options...
Skipper D Posted November 29, 2011 Report Share Posted November 29, 2011 Rod Caster had this thread last winter. some nice shacks on this site. My new one is on the 2nd page. Ice shacks home made or not Thier amazing , its interesting how inventive people get when they build them , i like seeing all the diferant styles ......... Link to comment Share on other sites More sharing options...
Fishnwire Posted November 29, 2011 Author Report Share Posted November 29, 2011 Well you asked for feedback;so here goes FishNwire I did ask for feedback and I appreciate every word of it. I'm not dismissing any of it...I'll just let you know my situation and what I'm thinking. Let me know if you think I'm still missing something. Your making your hut waaay too heavy. Secret is to keep it as light as possible for so you can handle it without an army of guys. First heavy snowfall is going to force ice down and water up: freezing those 2x10's into new ice unless you lift it weekly. A normal ice pick won't lift that weight. You would need a fence jack or other jacking means. Another problem arises with weight If there is slush on the lake in the spring when huts have to be off and can't get the truck out there to fetch it in. I've got a Jeep Rubicon with lift and decent winter tires, plus my buddy (whose property it will likely spend summers) has a 3/4 ton diesel with a plow. The hut won't go out until the ice is safe for a full-size vehicle and will come off before it isn't. Slush isn't a big problem in the spring as the bay drains into the river...the water level doesn't rise, it slowly drops. There isn't a lot of water coming up in the bay, even after hard snowfalls. I'll have a road plowed and area cleared before it goes out, if need be. I've got two 2-ton jack-alls from off-roading that will help me out too. I've got friends who live on the river and don't work in the winter...I should be able to count on them to shift it around every couple of days if need be. Hey, I know it's not going to be light...but I want a decent shack and the PITA it is to move around will hopefully be outweighed by its comfort level once its in place. I have been making huts since 1967 and not a pro builder that's for sure but the secret is to keep it as light as possible. Try 2x4's for floor joists and 2x2's for framing, printers plate with 1 inch styrofoam for walls and half inch plywood for roof and floor. Plan your hole layout etc before you put down plywood. Build a sleigh sturdy and light as possible with 10-12 inch height. Either welded 1 inch pipe or wood with black abs on the wooden runners. Take your valuables home with you when your not at the hut and leave it UNLOCKED. Thieves will smash your door in if they find it locked. One inch styrofoam seems a bit thin to me. I'm doing the floors/ceiling with 3" and the walls with 2.5". I want it warm enough to not only take off my coat...I want to be able to take off my boots! I have pretty much been convinced to go with 2x3s and 1/4 ply though...not 2x4's and 3/8 ply, that's for sure. I'm going to try to keep it light, but I want an actual structure...not just a covering, if you can understand what I mean. I'm planning on spending three and four days at a time using it...I want to feel like I'm "inside". As far as locking it up...its not really thieves I worry about as the area is frequented mainly by locals, their comings and goings known to my buddy whose property they park on and cross to access the water. My friend's hut which is there is sometimes used by whomever and I've come there to find little annoyances such as fish gut remnants on the floor, all the wood burned, or evidence of "partying" which I'd rather my wife or father not see. Dumb stuff like that. I just want to control who is using it more than anything else. Thanks for your input...it's definitely given me pause for thought and ammunition when I debate my father-in-law on issues of weight vs strength. Link to comment Share on other sites More sharing options...
Fishnwire Posted November 29, 2011 Author Report Share Posted November 29, 2011 That's a nice hut there, Sinker. Very nice. I really like your stove. It looks like exactly what I want. Do you mind if I asked where you got it and what you paid for it? Link to comment Share on other sites More sharing options...
Fishnwire Posted November 29, 2011 Author Report Share Posted November 29, 2011 You seem to be on the right track with your hut, I really like the notched out ski idea, it would tie everything together and give it strength. I recommend Ripped 2x6 walls ( so 2x3), and if your sheeting with 3/8" plywood - glued and screwed 24" stud centers will be plenty strong.. As the sheeting will add rigidity if it's glued and screwed too. I also recommend panelling the interior to give it a finished look, Which also gives you the option to paint as well. You've done a good job so far, so might as well make the inside nice to look at since that's what you see when your out there. I can't wait to see the finished product. I'm starting to think I'll panel the inside with something. Guaranteed after an outing or two of looking at styrofoam and studs I'll be wishing I would have. What do you think of 2x3's and 1/4 ply instead of 3/8's ply? I'm 90% convinced that's what I'm going to go with when I get to the lumber yard tomorrow morning. I'll tell you what friend...I can't wait to see the finished product either! Thanks for you your suggestions and compliments. Link to comment Share on other sites More sharing options...
Fishnwire Posted November 29, 2011 Author Report Share Posted November 29, 2011 Watch the 2 x 3's-most are finger jointed meant for light duty such as interior non load bearing partitions. You might wanna do the math and determine just how much weight you'll save by using less than 2 x 4 - on a hut that size fifty or a hundred pounds probably won't be a deal breaker. Michael Now you've got me rethinking the whole 2x3 idea. 2x3 = 1.5x2.5 = 3.75 2x4 = 1.5x3.5 = 5.25 Therefore 2x3s are about 71% the weight of 2x4s...right? Including the framing of the door and windows, I'll need something like 60 of them (if I recall correctly)...I don't know how much 7'4" (or whatever) 2x4 weighs, but a 29% reduction is not exactly negligible. Like I say...now you've got me thinking. Link to comment Share on other sites More sharing options...
Fishnwire Posted November 29, 2011 Author Report Share Posted November 29, 2011 Go ahead and build it big and heavy. Just go buy a farm jack "jack-all" from Canadian Tire for $80 (was on for $50 last week). I have no promblem with mine but don't leave it for more then a couple weeks without making sure it is lifted up high. I use chunks of 4x4 to hold up my hut from freezing into the ice. I have heard of people using ice blocks to hold up their huts but never tried it myself. Just have an ice cream pail at the hut and fill it with lake water and you can make al the blocks you need. I may try it this year as they do not need to be claened up at seasons end. I've got two jack-alls already, and was planning on blocking it up. I hear if you take 2x6's and glue some blue board insulation to their bottoms, they make excellent blocks which (due to the insulation in contact with the ice) resist freezing in. Link to comment Share on other sites More sharing options...
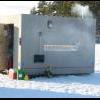
Fishnwire Posted November 29, 2011 Author Report Share Posted November 29, 2011 ....... Here we are , check this baby out 14'x16', built it in the back yard its framed with 2x3's , 1/4"plywood on the floor in 16" centers , and closed in with wood grain 5mm sheeting , i don't ice fish so its going to be my guest bunk house out back ..... cost 2200.00 for every thing i needed to build it . That's really nice. I like the Jeep in your avatar as well. What's it got? Link to comment Share on other sites More sharing options...
Sinker Posted November 29, 2011 Report Share Posted November 29, 2011 (edited) That's our second stove. That one we got from princess auto...it was cheap....maybe $100?? I'm not really sure. It works great though, and you can cook on it no problem. One fire log lasts about 6 hours when its real cold. Even then you have to open the door once in a while. No problem at all taking your coat off, but I like to have my boots on....its hard to keep the floor dry when your hauling fish out of it, and baiting hooks! We've spent many a weekend out in it, no problem. One cold, windy night, we had 13 adults inside "warming" up....lol....it was full to the brim, but we were all in there I keep it close to home, so no need to stay out in it, but we've had some good times out there! S. Edited November 29, 2011 by Sinker Link to comment Share on other sites More sharing options...
Fishnwire Posted November 29, 2011 Author Report Share Posted November 29, 2011 Rod Caster had this thread last winter. some nice shacks on this site. My new one is on the 2nd page. Ice shacks home made or not That's really nice. I haven't decided what I'm going to do about "facilities"...I thought maybe a pop up and a 5 gallon bucket might be the best I can hope for. Link to comment Share on other sites More sharing options...
mukluk Posted November 29, 2011 Report Share Posted November 29, 2011 Didn't know you had an arsenal of lifting and pulling devices at your disposal. lol With that equipment than there should be no problem dealing with the weight. Forgot to mention proper ventilation for wood stove. Have a window that will open. Going to be a nice hut. Enjoy Link to comment Share on other sites More sharing options...
Fishnwire Posted November 29, 2011 Author Report Share Posted November 29, 2011 That's our second stove. That one we got from princess auto...it was cheap....maybe $100?? I'm not really sure. It works great though, and you can cook on it no problem. One fire log lasts about 6 hours when its real cold. Even then you have to open the door once in a while. No problem at all taking your coat off, but I like to have my boots on....its hard to keep the floor dry when your hauling fish out of it, and baiting hooks! We've spent many a weekend out in it, no problem. One cold, windy night, we had 13 adults inside "warming" up....lol....it was full to the brim, but we were all in there I keep it close to home, so no need to stay out in it, but we've had some good times out there! S. I'll go to Princess tomorrow. You say it is your second stove...how come? Why did you replace it? The plan is to get a couple of pairs of slippers with water-proof soles. That way I'll keep my feet dry but still be able to put them up on the bench and have a little nap. I'm putting this hut about an hour from home. That way I can be on the ice for sun-up without having to get out of bed at 4 am. Also I can get the sun-down fishing in and not have to worry about driving home in the dark after a day of fishing and the occasional beer or two. It also facilitates taking a nap during the midday hours which are often slow. Link to comment Share on other sites More sharing options...
Fishnwire Posted November 29, 2011 Author Report Share Posted November 29, 2011 Didn't know you had an arsenal of lifting and pulling devices at your disposal. lol With that equipment than there should be no problem dealing with the weight. Forgot to mention proper ventilation for wood stove. Have a window that will open. Going to be a nice hut. Enjoy I've got two insulated double pane sliding windows going in. They're quite nice and I only paid $5 each for them. Thanks again for your input. Every single thing you said was bang-on. A lot of it I had already thought of but if I hadn't, I would have really been missing something and the head's up would have been invaluable. That's what's so awesome about this site. People here know stuff and they'll take the time to share it with you...at no cost! All you have to do is ask. What a concept! I'm fairly certain I will "enjoy"...Thanks again. Link to comment Share on other sites More sharing options...
Sinker Posted November 29, 2011 Report Share Posted November 29, 2011 The first stove we had was an ooooold coal burning stove, with a water jacket on it. It was a great stove, but was burnt out. This one is only has two seasons on it, but so far, so good. Its fairly solid, but not too heavy, and will burn a 16" log. S. Link to comment Share on other sites More sharing options...
Fishnwire Posted November 29, 2011 Author Report Share Posted November 29, 2011 I'll see what my local PA has. Thanks. Link to comment Share on other sites More sharing options...
cheaptackle Posted November 29, 2011 Report Share Posted November 29, 2011 Now you've got me rethinking the whole 2x3 idea. 2x3 = 1.5x2.5 = 3.75 2x4 = 1.5x3.5 = 5.25 Therefore 2x3s are about 71% the weight of 2x4s...right? Including the framing of the door and windows, I'll need something like 60 of them (if I recall correctly)...I don't know how much 7'4" (or whatever) 2x4 weighs, but a 29% reduction is not exactly negligible. Like I say...now you've got me thinking. 29% is noticeable for sure BUT if you're talking 29% of 200 lbs of 2 x 4 the savings is only about 58 lbs. That's a lot for a small hut, but on yours I don't really think you'd even detect it. Best way to figure this out is calculate the total lineal footage you're going to use, weigh 8 feet each of 2 x 4 & 2 x 3 then take it from there. One suggestion I saw had 2 x 6 being ripped to 2 x 3 - that would be stronger than the finger joint stuff I'd think Now if you really want to complicate it consider the weight of cedar vs SPF Link to comment Share on other sites More sharing options...
Fishnwire Posted November 30, 2011 Author Report Share Posted November 30, 2011 (edited) Update...Tuesday, November 29/2011 Well I made the decision...I'm going with 2x3s and 1/4 ply. The 2x3s seem pretty light...I think their smaller size means they dry out more and have a lower moisture content. I could be wrong, but they feel around half the weight of a 2x4. Noticeably lighter anyway. You can't get a 12 foot 2x3, four of which I require for headers and footers, so we had to splice them. More on that later. I could have got 3/8 unsanded ply for about $6 a sheet less than the 1/4 "one good side" I opted for. I couldn't find the 1/4 in unsanded, but I'll want to paint or stain it anyway, so it's probably for the best. Also, 1/4 ply is only two thirds the weight of 3/8s. The nice thing is that we have the finished floor to work off of and use to keep everything lined up and square. We want the plywood to extend past the footers and headers of the stud walls so it covers and can be glued and screwed to the floor and roof joists. We're going to use the full eight feet, so we used the eight foot width of the hut to line things up. We started by measuring what we need to extend to the floor joists, and clamped our footers that distance from the edge. Then we did the same with the header, and put the corner joists in. Next we positioned the window where we wanted it, and framed it. Then we had to deal with our splices for the header and footer. The header has the four foot section on the left and the 8 foot section on the right, and the footer the opposite, so that the splices are "kitty-corner" to one another, and not one below the other. Once the studs on either side of the seam were in place, we cut 2x3's to fit, and applied glue. Then we clamped them down and put the screws to them. We left those to set and have about another half an hour of studding left until we can put the plywood on. Then we'll take the finished wall outside and start the next one. We did have a couple things go wrong today. When we went to cut our second stud with my Brother-in-law's mitre saw, the blade guard's auto retract stopped working...it appears some spring is broken. I had just seen a 10" laser sliding compound mitre saw and sale at Lowe's and said, "To heck with it", ran back there and picked it up. I could have done without having to drop the cash but it is quite a nice saw and a joy to use. I was planning on getting one sooner or later...sooner is OK. The thing that really drove me nuts though was my Father-in-law and the screws he brought. When we were making the shopping list he said, "Don't buy 3 inch wood screws...I have lots." The problem was that they were all ones he used on concrete forms and reclaimed. See anything wrong with these? About a quarter of them were bent, and most of the other ones' recesses were either stripped or partially full of hardened concrete. What a PITA! I appreciate him helping me out with supplies, but I would have much rather just spent a couple a bucks and had screws I didn't have fight with. I love having him around and his experience is often invaluable...but when he pulls that kind of stuff (which he does all the time) he drives me freakin' nuts! I'm back at the mine for the next five days, 12 hour shifts...so I probably won't have much progress to report for a while. I'd love to blow off a week or so, but if you added the lost pay to the cost of the build, I'd have to live in the hut to pay for my divorce lawyer. Love the questions and comments from you folks...they keep my obsession focused. Edited November 30, 2011 by fishNwire Link to comment Share on other sites More sharing options...
Tom McCutcheon Posted November 30, 2011 Report Share Posted November 30, 2011 Don't let the PITA bother you. As you have said, his experience is invaluable. Just say "Thanks for the help POP" and then move on. One day you may be looking for his advice on something and it won't be there. That is going to be one comfy shack.. Link to comment Share on other sites More sharing options...
ctdd2006 Posted November 30, 2011 Report Share Posted November 30, 2011 Is that going to be a "Vermillion" castle? Looking really good! Link to comment Share on other sites More sharing options...
Billy Bob Posted November 30, 2011 Report Share Posted November 30, 2011 VERY INTERESTING THREAD.... BIG But interesting. Keep it coming....maybe you should rent this winter home out during the week when your not using it.... Bob Link to comment Share on other sites More sharing options...
walleyejigger Posted December 2, 2011 Report Share Posted December 2, 2011 Is that going to be a "Vermillion" castle? Looking really good! lol, i have a vermillion castle, if it wasnt for the comfort of the castles nobody would be there cause there's hardly any fish worth catching, more of a "social" lake if you get my drift, my actual "fishing hut" is quite a bit further from home, the castle is a 15 minute drive, Link to comment Share on other sites More sharing options...
Fishnwire Posted December 2, 2011 Author Report Share Posted December 2, 2011 lol, i have a vermillion castle, if it wasnt for the comfort of the castles nobody would be there cause there's hardly any fish worth catching, more of a "social" lake if you get my drift, my actual "fishing hut" is quite a bit further from home, the castle is a 15 minute drive, I don't actually get the joke. I know that "vermillion castle" is a rock formation (no?). My camp happens to be near the head end of the Vermillion River...but you probably didn't know that and the hut is not going there anyway. Is this in reference to the little ice village that springs up off 17 on the Vermillion? Link to comment Share on other sites More sharing options...
Billy Bob Posted December 3, 2011 Report Share Posted December 3, 2011 Time for a current update.... Link to comment Share on other sites More sharing options...
walleyejigger Posted December 3, 2011 Report Share Posted December 3, 2011 vermillion lake itself is between chelmsford and dowling, and in the winter becomes overtaken by castles/mansions or wutever ppl. like to call them, it's primarily a party lake, fishing is done but not too seriously, easily drivable by truck and most of the time by car, literally hundreds of huts and many of them are just as nice as houses, with the comforts as well, many have a satellite dish or solar panels or christmas lights/ trees, street names, etc., roads are plowed on the lake quicker than our city/town streets, most years i make a jug curling rink on the lake, painted circles and lines and all. visiting family and friends during winter months happens more at the castle than our actual homes, thus the reason i have 2 huts, one for socializing and another on a different lake for actual fishing, whitewater lake in azilda is the same, Link to comment Share on other sites More sharing options...
Fishnwire Posted December 5, 2011 Author Report Share Posted December 5, 2011 Time for a current update.... You'll get that tomorrow night. I'm off this week Monday to Thursday so I'm hoping to make some real progress. I'm dying to get over there and get back to work in the morning. Being obsessed with something is fun! Link to comment Share on other sites More sharing options...


Recommended Posts
Create an account or sign in to comment
You need to be a member in order to leave a comment
Create an account
Sign up for a new account in our community. It's easy!
Register a new accountSign in
Already have an account? Sign in here.
Sign In Now