troutboy Posted December 21, 2009 Report Share Posted December 21, 2009 (edited) Iam just wonder how to make homemade tip ups,or tipdowns.I kinda got a plan but its not that detailed. http://www.ehow.com/how_4827475_build-tipd...ce-fishing.html Edited December 21, 2009 by troutboy Link to comment Share on other sites More sharing options...
richyb Posted December 21, 2009 Report Share Posted December 21, 2009 (edited) I just use a coat hanger and an elastic on a home made jigging stick and set it in a stand You should be able to adjust the balance by moving your coat hanger each way so that the bait falls or raises slow so that the fish dont feel much resistance. Edited December 21, 2009 by richyb Link to comment Share on other sites More sharing options...
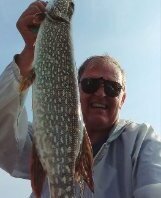
Woodsman Posted December 21, 2009 Report Share Posted December 21, 2009 Tip-ups/tip-downs is such a broad term. There are many different designs of which some work better than others for different situations. Let us know on what type/types of fish your targeting and if you are in a hut or in the open. Then maybe we can give you some suggestions on the better types of tip-ups for you. IMO the plan/design you have posted is one of the poor designs. The weight of the reel constantly holds up the arm. This will not be sensitive to light bites & will not react at all to a bait being lifted off the bottom like whitefish tend to. For fish like pike that run with the bait it should be OK. Good luck: Rick Link to comment Share on other sites More sharing options...
rylan Posted December 21, 2009 Report Share Posted December 21, 2009 The easiest way to make a tip up is this: Grab a few 2x4's... cut to size -- normally about a foot or so-- both pieces ( the height above the water) then connect them with some screws- Make a T. At the top of the T, drill a hole. Place a spool of ( whatever ) line with a screw- Dont have it to tight. Done. As you are making your way out on the ice-- make sure you pick up a few long but flexible sticks. Drill your hole, place the tip up with the T and line facing the hole. Drop the bait in the water. Once you are at the depth you want, make a loop in the line and place the loop on the stick. The stick should act as your rod. You may want to place something red or orange on the line, as an indicator -- Wait--- If you go to your local home hardware store-- pick up a 12 foot 2x4--- go to the dollar store and buy some cheap line- You can almost make 10 tip ups for under 30 bucks.... Link to comment Share on other sites More sharing options...
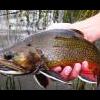
troutboy Posted December 21, 2009 Author Report Share Posted December 21, 2009 Thanks! Im targetting brookies and walleye with no shelter,im thinking of just buying some windproof tipups instead of going thru all the frustration and time on making them,im still open to some ideas on makin' them! Link to comment Share on other sites More sharing options...
richyb Posted December 21, 2009 Report Share Posted December 21, 2009 Leechman made some pretty nice ones, maybe he can hook you up with some plans. Link to comment Share on other sites More sharing options...
troutboy Posted December 21, 2009 Author Report Share Posted December 21, 2009 Thanks! Ill give him a shout! Link to comment Share on other sites More sharing options...
wil wegman Posted December 21, 2009 Report Share Posted December 21, 2009 Re: Thanks! Im targetting brookies and walleye with no shelter,im thinking of just buying some windproof tipups instead of going thru all the frustration and time on making them,im still open to some ideas on makin' them. IF I were in your shoes ... that's exactly what i would do as well. HT Makes the Windlass Tip Ups that keep your bait moving with even the slightest breeze and these are great. When the temps get way too frigid (likely quite often in TBay) you'll appreciate the no-freeze qualities of their Polar Tip's. I don't know of any homemade jobs that can match the features of either and they're well worth the money. Wil Link to comment Share on other sites More sharing options...
richyb Posted December 21, 2009 Report Share Posted December 21, 2009 IF I were in your shoes ... that's exactly what i would do as well. HT Makes the Windlass Tip Ups that keep your bait moving with even the slightest breeze and these are great. When the temps get way too frigid (likely quite often in TBay) you'll appreciate the no-freeze qualities of their Polar Tip's. I don't know of any homemade jobs that can match the features of either and they're well worth the money. Wil I have both the windlass and the polar tip ups and prefer the polar ones. I have had the windlass freeze up and even on windy days I cant get alot of action goin anyways. Link to comment Share on other sites More sharing options...
troutboy Posted December 21, 2009 Author Report Share Posted December 21, 2009 Thanks,ill probaly pick up some polar tipups on boxing day when there cheap thats the bonus of boxing day,everythings on sale! Have a merry christmas! Link to comment Share on other sites More sharing options...
Leecher Posted December 21, 2009 Report Share Posted December 21, 2009 Thanks! Ill give him a shout! Hey ya Chris, here's how you make your own tipups..... you'll require some tools before you start this project and here is the list of items required: 1. Band saw 2. Press drill with 3/32" & 1/2" bit 3. Jigsaw with fast cutting blade 4. Sand paper (coarse and fine) 5. 2" finishing nail 6. Metal eye (screwing type) 7. Plastic reels (Wall Mart sells them for $2.99 - $4.99 each depends if they're on sale or not) 8. Paint & paint brush 9. 1 - 1" x 2" x 4' strip of pine ( be selective..... get yourself to straightest piece) Step 1 Proceed in cutting the 1"x 2" into 23" length. This will give you your base and top. Using the jigsaw, score the top of one of the 1" x 2" you just cut across about 1/2" to 3/4" deep in the middle. Using a piece of coarse sand paper, folded in 2, enlarge the mark by passing the paper into it. You will have to fold it again so that the nail can be inserted freely. Test as you go. You can also use a routing table with a special bit to accomplish this task..... much more precise with the guides on the table Step 2 Proceed in creating the notch at the top of the base. Measure 2" down and drill a hole in the middle using the 1/2" bit. See picture below: Now you'll be able to use the band saw and cutout the rest of it. See results on next picture: Step 3 (The top) The top can be really simple by cutting the piece in half and adding the plastic reel or you can be creative like I do and make some pretty cool design shown on the pic below: For the special design, remember to leave 4 1/4" at the back to be able to add the plastic reels. Once you have made the top to your likings, hold the top piece vertically center on your forefinger so that it's perfectly balanced and mark the spot on the piece...... from that mark, measure & mark in 1/4 inch intervale 9 more toward the back of the piece.... this will give you different settings from light to heavy. Using the the press drill and 3/32" bit, proceed in punching the holes See pic below: Step 4 (the paint) You are now ready for painting.... apply 2 coats of white water based paint and once dry, coat the top with a dark color leaving the base white..... this will help when you are fishing and a fish strikes..... apply 2 coats of water based varnish to protect the pieces. Step 5 ( the final installation ) Now all you need to do is install the reel, see pic below: and the screw on eyelets. I usually add 2 of them, 1/2" from the end and in the middle but that one is optional. Hope this helps you out and please post your results if you make some..... would like to see your design Here's a few more pics from the last ones I made last year: Leechman Link to comment Share on other sites More sharing options...
troutboy Posted December 22, 2009 Author Report Share Posted December 22, 2009 Thanks leechman! Going to try them out! Link to comment Share on other sites More sharing options...
Guest ThisPlaceSucks Posted December 22, 2009 Report Share Posted December 22, 2009 my home made tips were made of an old hockey stick, a bathroom door stopper spring, a wooden dowel, an eyelet, and a spool of ice fishing line... very simple, very sensitive, and very visible. Link to comment Share on other sites More sharing options...
Leecher Posted December 22, 2009 Report Share Posted December 22, 2009 Thanks leechman! Going to try them out! Your welcome Chris!!! Link to comment Share on other sites More sharing options...
fishinguypat Posted December 22, 2009 Report Share Posted December 22, 2009 i have a plan to make a cheap tip up...i have some cheap line laying around 15 pound test on a big wide spool... couls i tie my lure directly to the spool ,drop it down, then just put a circular stick through the spool so if a fish comes it could let out line? Link to comment Share on other sites More sharing options...
Guest ThisPlaceSucks Posted December 22, 2009 Report Share Posted December 22, 2009 i apologize for this artists rendering, but it was a simple design that performed well up north for lake trout. Link to comment Share on other sites More sharing options...
Woodsman Posted December 22, 2009 Report Share Posted December 22, 2009 Dr. S that is a good type. I'm in the process of building one quite similar. Link to comment Share on other sites More sharing options...
anders Posted December 22, 2009 Report Share Posted December 22, 2009 i apologize for this artists rendering, but it was a simple design that performed well up north for lake trout. thats what i am using to Lucas...the exact same set up. Works well for me for everything from perch to lakers and specks to eyes. My buddy modified his though....he uses pvc pipe and a dowling as well...however, he put a fuse or something on the top so when the dowling went down a certain distance it triggers the fuse and makes a sound and the top will light up. I think the light is a light from an over. Works great...especially when your not paying attention or for eyes at night. Link to comment Share on other sites More sharing options...
splashhopper Posted December 22, 2009 Report Share Posted December 22, 2009 (edited) i apologize for this artists rendering, but it was a simple design that performed well up north for lake trout. Hey Doc..... what is holding the line at the end of the dowel? Looks like a swivel of some sort. I might try this... just for the helluv it. I don't think my wife will notice a doorstop missing either ! But I will tape one of the 3" throw away glow sticks on the end as well Edited December 22, 2009 by splashhopper Link to comment Share on other sites More sharing options...
Guest ThisPlaceSucks Posted December 22, 2009 Report Share Posted December 22, 2009 i'm not sure it's application beyond fishing (like it matters) but on the end of the tip ups is a small screw in eyelet. Link to comment Share on other sites More sharing options...
troutboy Posted December 22, 2009 Author Report Share Posted December 22, 2009 (edited) Thank you Dr salvinius! Another great idea to try! Do you have to set it down,then when the fish bites it sets the hook? Edited December 22, 2009 by troutboy Link to comment Share on other sites More sharing options...
canadadude Posted December 22, 2009 Report Share Posted December 22, 2009 i apologize for this artists rendering, but it was a simple design that performed well up north for lake trout. These tip-ups work great, I've been using these for years, I've modified mine with an eye midway down the dowel but it really isn't needed. Like said before these tip-ups work for all species. The only other thing I use in a pinch is an Alder twig an a spool of line good ole school method. Link to comment Share on other sites More sharing options...
Guest ThisPlaceSucks Posted December 22, 2009 Report Share Posted December 22, 2009 Thank you Dr salvinius! Another great idea to try! Do you have to set it down,then when the fish bites it sets the hook? hey. not sure what you mean. the bottom of the hockey stick is generally stuck into the snow...when a fish bites the sensitive bathroom stopper allows the dowel to bob up and down, without barely any resistance... if you mount your line properly it will be allowed to spool out line if you have a fish take the bait and swim as they so often do... when a fish bites you just grab the line. Link to comment Share on other sites More sharing options...
splashhopper Posted December 22, 2009 Report Share Posted December 22, 2009 i'm not sure it's application beyond fishing (like it matters) but on the end of the tip ups is a small screw in eyelet. What is the "reel" that you have there? And how does it stay "locked" while still fishing? Thanks again. Link to comment Share on other sites More sharing options...
anders Posted December 22, 2009 Report Share Posted December 22, 2009 IM not sure about the doc...but on mine...all i have through the spool of line is a small nut and bolt....i can keep it tight, or reel loose depending on the species im fishing for...and i use the exact same set up. Link to comment Share on other sites More sharing options...


Recommended Posts
Create an account or sign in to comment
You need to be a member in order to leave a comment
Create an account
Sign up for a new account in our community. It's easy!
Register a new accountSign in
Already have an account? Sign in here.
Sign In Now